7.0 Camera deployment#
Once the project-level aspects of a survey have been decided, the next step is to consider the camera hardware options (e.g., Camera Make and Camera Model), camera settings, field equipment, whether to use attractants (bait or lure), camera placement considerations, and important metadata to collect.
7.1 Camera hardware options#
Remote cameras consist of a digital camera with a lens, external flash, and a passive infrared and/or motion detector (among other features; Figure 4).

Figure 4. Examples of the a) external components and b) internal controls and components of a remote camera (Reconyx PC900; Reconyx Inc., 2017)
The camera “make” is the manufacturer of a particular camera (e.g., Reconyx), and the “model” is the model number of a particular camera (e.g., PC900). There are many different options and features to choose from when deciding upon the best Camera Make and Camera Model for a particular study, which differ in their impacts on detection probability. For this reason, deploying multiple Camera Models within a study is not advisable (Palencia et al., 2022; Wellington et al., 2014).
It is common for new camera users to confuse the specifications of a particular Camera Make and Camera Model with the camera’s settings. Specifications refer to the camera’s features (characteristics), while settings are options that the user can change. When choosing a Camera Make and Camera Model, important specifications include trigger speed, recovery time, detection zone (i.e., the area [conical in shape] in which a remote camera can detect the heat signature and motion of an object Rovero & Zimmermann, 2016; see Figure 5), battery life and flash type. The best choice of Camera Model will depend on the Survey Objectives, modelling approach, Target Species, and physical environment.
Here are a few examples of specifications to achieve certain Survey Objectives:
To estimate density with the random encounter models (REM; density) approach – use a camera with a fast trigger speed, a wide detection zone, no-glow infrared (IR) flash, and the ability to take bursts of photos (Rovero et al., 2013).
To estimate density or abundance with mark-recapture methods – use a camera with a white flash, a short recovery time, and a fast trigger speed (Rovero et al., 2013). Note that white flashes may scare some animals and potentially reduce the number of recaptures (Séquin et al., 2003; Wegge et al., 2004).
Occupancy studies need a fast trigger speed (Trigger Sensitivity - high) (although the importance of which is species-dependent; Rovero et al., 2013).
Faunal detections generally require a fast trigger speed (Trigger Sensitivity - high) and a wide detection zone.
Note
Most modelling approaches require a fast trigger speed (however, the use of bait or lure may compensate for slower trigger speeds in some cases).
Given the numerous Camera Models available and the frequent release of new models, it would be difficult to recommend a make and model to fit all users’ needs. However, there are many studies and reviews that compare the specifications and the utility of different Camera Models (e.g., see https://www.trailcampro.com/collections/trail-camera-reviews; https://www.mammalweb.org/images/schools/Camera-trap-buying-guide.pdf; Fisher & Burton, 2012; Rovero et al., 2014; Rovero & Zimmermann, 2016; Seccombe, 2017; Wearn & Glover-Kapfer, 2017).
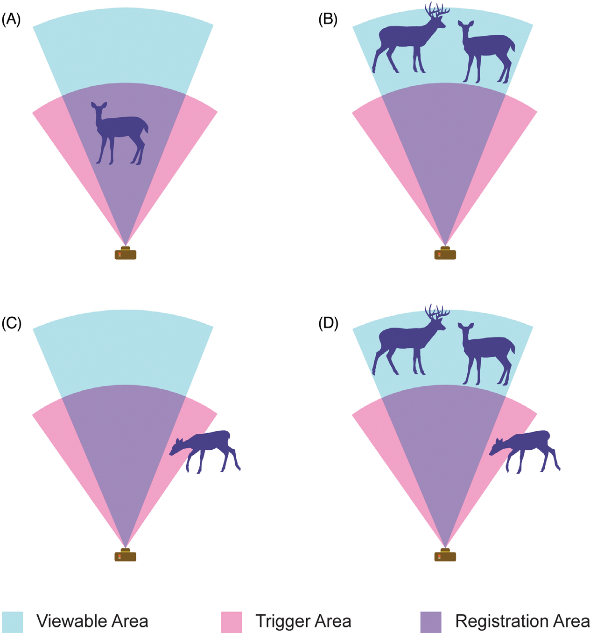
Figure 5. The ability to detect an animal will vary according to the camera specifications (and settings). Important specifications include the camera’s detection zone (here termed “trigger area”), Field of View (FOV; “viewable area’), and”registration area” (the area in which an animal entering has at least some probability of being captured on the image) (Moeller et al., 2023).
7.1.1 Battery type#
Most remote cameras require AA batteries. It is recommended to use lithium batteries, as opposed to alkaline or nickel metal hydride, because they are less affected by cold temperatures. Battery life will be affected not only by the type of batteries but also by the camera settings, temperature, and number of images or videos taken (which are dependent on the camera settings, placement, and level of activity in front of the camera) (Wearn & Glover-Kapfer, 2017). However, some camera user manuals contain information on battery performance and the total number of images a camera can be expected to collect before the batteries die (based on the operating temperature and battery type, e.g., Reconyx HyperFire Instruction Manual [Reconyx Inc., 2017]).
7.1.2 SD cards#
It is important to consider the size, type, and class of SD (Secure Digital) card since the available options vary in storage capacity, compatibility, and write-speed (Wearn & Glover-Kapfer, 2017).
The size of the SD card (i.e., storage capacity) should be considered in relation to the expected duration of deployment, the deployment area, and the level of activity expected to occur in front of the camera. For example, a camera placed in a grassy area might be expected to produce more false triggers due to grass waving in front of the camera. Or perhaps a camera placed near a den might be expected to have higher animal activity. Both situations might warrant using a larger SD card. A 4 GB SD card is capable of storing ~8,000-20,000 images (400-900 KB in size), which might be sufficient if you plan to revisit the camera frequently (~every four weeks) (Wearn & Glover-Kapfer, 2017). We suggest using a card with at least 16 GB, and Wearn & Glover-Kapfer (2017) suggest larger (32 GB) if the video is enabled or if the camera will be active for long periods.
There are three types of SD card: standard (SD; maximum memory of 2 GB), high-capacity (SDHC; maximum memory of 32 GB) and extended-capacity (SDXC; maximum memory of > 32 GB) (Wearn & Glover-Kapfer, 2017). Note that SDHC cards are not compatible with most Camera Models. Be sure to check the camera user manual to confirm the compatible SD card type(s) (Wearn & Glover-Kapfer, 2017).
The “class” of an SD card (e.g., class 2, 4, 6, or 10) indicates the “write-speed” (i.e., the speed at which the SD card can read and write data; Wearn & Glover-Kapfer, 2017). Slower write speeds may perform poorly if the camera is set to collect images continuously, as fast as possible (i.e., rapid-fire or “near-video”) or if the video setting is activated. It is recommended to use an SD card of class 4 or higher, ideally class 10 (Wearn & Glover-Kapfer, 2017).
Caution should be used when deploying older SD cards (Wearn & Glover-Kapfer, 2017) and, perhaps, microSD card types; a few remote camera users in Alberta have described a 50% SD card failure rate with microSD cards (St. Clair, personal communications). See Wearn & Glover-Kapfer (2017) for additional information on choosing and maintaining (i.e., regularly formatting) SD cards.
7.2 Camera settings#
As mentioned above, in camera hardware options, it is important to distinguish between camera specifications (features) versus settings (user-defined options). Important settings often include Trigger Sensitivity (which may affect detection probability), Motion Image Interval and Quiet Period. The setting option selected may vary according to the Survey Objectives, modelling approach, Target Species, and use (or not) of attractants. Consideration of the camera settings is an important step when designing a survey and in the interpretation of the resulting images.
An example of the settings available in a Reconyx camera is included in Appendix A - Table A3.
7.2.1 Photos vs video#
Some Camera Models allow the user to record video as well as photos. Videos typically use more memory on SD cards, drain camera batteries sooner and are more difficult to process (i.e., extract data) than images. Limiting the length of video taken when the camera is triggered (possible for most Camera Models) could help slow how quickly an SD card becomes full. Some Camera Models have hybrid settings, which lets you capture photos and videos for each animal detection.
It is generally recommended that cameras are set to capture images rather than videos unless the objective is related to monitoring animal behaviours, understanding group size and/or determining recruitment (e.g. calves per female), in which case continuous observation may be important. Video is also useful when individual identification is needed, such as for creating “marked” individuals for use in machine learning or computer vision (e.g., Schneider et al., 2019; Vidal et al., 2021).
By default, cameras are set to record images when an animal is detected by the motion and/or infrared detector(s).
7.2.2 Trigger Mode(s) - Time-lapse vs. motion detector#
By default, remote cameras are triggered to take photos when the motion detector detects an animal. Many Camera Models allow you to set your camera in both time-lapse and default motion detector settings.
Time-lapse images are images taken at regular intervals (e.g., hourly or daily, on the hour), regardless of whether an animal is present or not. It is critical to take a minimum of one time-lapse image per day at a consistent time (e.g., 12:00 p.m. [noon]) to create a record of camera functionality or local environmental conditions (e.g., snow cover, plant growth, wildfire; Sun et al., 2021)
Time-lapse images may always be useful for modelling approaches that require estimation of the “viewshed“ (i.e., “viewshed density estimators,” such as REM or time-to-event (TTE) models; see Moeller et al., [2018] for advantages and disadvantages).
7.2.3 Trigger Sensitivity, Photos Per Trigger, Motion Image Interval and Quiet Period#
The Trigger Sensitivity is camera setting responsible for how sensitive a camera is to activation (to “triggering”) via the infrared and/or heat detectors (if applicable, e.g., Reconyx HyperFire cameras have a choice between “Low,” “Low/Med,” “Med,” “Med/High,” “High,” “Very high” and “Unknown”). That is, how the camera is activated once the animal enters the detection zone. A high Trigger Sensitivity is ideal when estimating density or abundance using mark-recapture or occupancy modelling (Rovero et al., 2013). The more easily (and faster) the camera is triggered, the more likely it is to photograph approaching animals as they enter the area (Apps & McNutt, 2018). High Trigger Sensitivity (and fast Motion Image Intervals) are less necessary if attractants are present (Rovero et al., 2013). Refer to section 6.2 for examples of ideal Trigger Sensitivity settings to achieve certain Survey Objectives.
The camera user can also predefine the number of photos taken each time the camera is triggered (i.e., “Photos Per Trigger, e.g., 1, 2, 3, 5 or 10 photos). The user can specify the time interval between images (i.e., the “Motion Image Interval“) or the time interval between image sequences (i.e., the “Quiet Period“ or “time lag,” depending on the Camera Make and Camera Model). The Quiet Period differs from the Motion Image Interval in that the delay occurs between multi-image sequences rather than between the images contained within multi-image sequences (as in Motion Image Interval). Setting the camera to take continuous photos (i.e., the Quiet Period set to “no delay”) will fill the SD card with more photos per detection; however, it may provide important information for identifying individual animals, determining enter-leave times and regarding animal behaviours / interactions.
Generally, it is recommended to set the Trigger Sensitivity to “high,” Photos Per Trigger to “1” and the Quiet Period to “no delay” between consecutive triggers (Appendix A - Table A3).
7.3 Attractants vs. no attractants#
Attractants (i.e., bait or lure) can increase the detection probability by drawing animals into the camera’s detection zone, thereby effectively increasing the sampled area.
Bait is a food item (or other substance) that is placed to attract animals via the sense of taste and olfactory cues (Schlexer, 2008). Lure is any substance that draws animals closer; lures include scent (olfactory) lure, visual lure and audible lure (Schlexer, 2008).
There are many options of bait and lure available, and those used in camera studies have included commercial scent lures, food baits, carcasses and compact disks (see Wearn & Glover-Kapfer, 2017 for details and examples). Scent lure is typically applied to objects in the detection zone (e.g., trees or rocks), whereas a food lure is generally hung up or placed behind wire mesh to limit tampering by animals. Food rewards (baits or carcasses) are also used but are more likely to influence behaviour and inter- and intra-specific interactions (e.g., avoidance of an area or conflict between individuals or species) and may result in food conditioning, which in turn may lead to human-wildlife conflict.
Some options are costly and require frequent reapplication during the survey deployment. Users should consider the additional cost of supplies and labour required to revisit the field to reapply at the frequency necessary to maintain effectiveness. Scent lure dispensers, such as those developed by the Woodland Park Zoo, may help reduce the number of visits needed for reapplication and associated costs.
Few studies have compared the efficacy of different types of attractants, but both Espartosa et al. (2011) and Thorn et al. (2009) suggested that food baits are more effective than scent lures for many species (although these evaluations did not include wildlife species from Canada).
Since species may respond to lure types and scents differently, the type of lure chosen (if any) should be based on the biology of the Target Species but also on the Survey Objectives and the survey environment. For example, liquid products may be less suitable in areas where precipitation is high. Some lure types smell like the urine of a particular species, which could result in higher detections of certain species by activating an investigative response while resulting in avoidance by other species. Interestingly, a study (Holinda et al., 2020) by members of WildCAM found no evidence that scent lure placed at camera stations repelled non-target (i.e., prey) animals (see also Mills et al., 2019); rather, both predators and prey showed varied responses to the scent lure.
For many modelling approaches, placing bait or lure may violate model assumptions and increase the likelihood of biased results (e.g., lure might amplify measures of occurrence, biasing estimates of space use [Stewart et al., 2019]). Attractants may also introduce variation in the response by species, individuals or Sex Classes (or over space or time) that would not naturally occur. It may be possible to address biased samples in the analysis stage, but this can require substantial amounts of data.
In contrast, placing bait or lure can also help to better satisfy the assumptions of some modelling approaches. For example, attractants might be deployed to help satisfy the assumption of constant detection probability of occupancy (when using a systematic random design), relative abundance and capture-recapture (CR; Karanth, 1995; Karanth & Nichols, 1998) models by increasing individuals’ detection probability (Wearn & Glover-Kapfer, 2017).
Bait or lure may be a “necessity” for species (or areas) where detection is unlikely without a large number of remote cameras or lengthy surveys. Most studies that use attractants target carnivore species, which are often elusive, difficult to monitor and occur at low densities.
In general, we recommend against the use of bait or lure for projects focused on unbiased detection of as many species as possible. Overall, the use of attractants is not recommended unless the study is an occupancy or capture-recapture study of a Target Specieswith low detection probability (Wearn & Glover-Kapfer, 2017).
We advise against the use of bait in or near urban areas due to the possible increase in human-wildlife conflict. To minimize this potential, bait or lure should not be placed within 200 m of residences, industrial or recreational facilities, campgrounds, 100 m of active human-use trails (e.g., hiking trails), or 50 m of roads.
Where attractants are used, users must follow provincial policy and legislation (e.g., BC Wildlife Act – Section 33.1, Alberta Wildlife Act and Wildlife Regulation), as well as local bylaws. Before deploying any remote cameras in the field, users must also obtain the necessary permits from provincial and/or research institutions (e.g., animal care permits). In Alberta, a wildlife research and collection permit is required when using bait or lure. Special conditions or restrictions may also apply. Refer to https://www.alberta.ca/wildlife-research-and-collection.aspx for further details. In British Columbia, a research permit is required when using bait, but not scent lure. Special conditions or restrictions may also apply in each province.
Consideration of placement locations should include proximity and potential impacts to First Nations Reserves and Metis Settlements. You can find information on First Nations Reserves and Metis Settlements using the Landscape Analysis Indigenous Relations Tool (LAIRT) (Government of Alberta, 2023a) located within the Landscape Analysis Tool (LAT) (Government of Alberta, 2023b) (see “Non-Administered Areas”). The results produced by LAIRT do not provide an official list of First Nations and Metis settlements to consult if consultation is required since “LAIRT will report on where government ordinarily considers requiring consultation with a particular First Nation or Metis Settlement, which is subject to be revised at any time” (Government of Alberta, 2023a).
7.4 Camera placement#
When deploying a remote camera, important considerations include whether to place cameras on or aim cameras toward specific features, as well as the attachment point, height, angle and direction.
The information in this section is also included in a step-by-step description of the deployment process (Appendix A - Table A5).
7.4.1 FOV Target Feature#
Remote cameras may be deployed to capture detections on specific man-made or natural features (i.e., “FOV Target Feature“) to maximize the detection of wildlife species or to measure the use of that feature. “FOV Target Features may include, for example, game trails, human trails, watering holes, mineral licks, rub trees, nest sites, etc.
FOV Target Features differ from Camera Location Characteristics (see below) in that FOV Target Features are features the camera is aimed towards (e.g., a seismic line). In contrast, a Camera Location Characteristics may include features outside of the camera’s FOV (e.g., meadow habitat).
The decision of where exactly to place the camera will be influenced by the feature to target, the Survey Objectives and the number of Target Species, and, importantly, the sampling design, intended analysis and associated statistical assumptions.
Deploying cameras on or near FOV Target Features can provide meaningful information for some objectives, but often introduces detection biases (Wearn & Glover-Kapfer, 2017). These biases make it difficult to extrapolate findings to areas without these features or to collect data on multiple Target Speciesthat vary in their use of these features (Wearn & Glover-Kapfer, 2017). To reduce potential biases, cameras should ideally be deployed using a paired design, with cameras on- and off-FOV Target Features (e.g., on- and off-trails).
In general, cameras should be placed approximately 3–5 m from the FOV Target Feature (Figure 6; the “FOV Target Feature Distance (m)“ Figure 7). If cameras are placed too close to the FOV Target Feature, some species may not be detected since the camera may be too high to capture smaller species or the movement speed of certain species. In contrast, if cameras are placed too far from the FOV Target Feature (e.g., > 5 m), animals detected at night may not be visible in the images because they are less likely to be illuminated by the infrared flash.
This recommendation can be relaxed if users plan to estimate the detection distance (i.e., “the maximum distance that a sensor can detect a target” [Wearn and Glover-Kapfer, 2017]) and account for variability in detection probability.
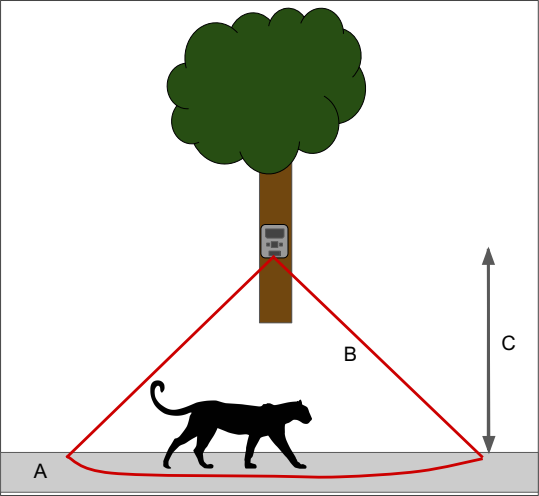
Figure 6. Illustration of a remote camera showing (A) the FOV Target Feature (a trail), (B) the camera’s detection zone (everything inside the red outline), and (C) the distance of the camera to the FOV Target Feature. Note that the detection zone will vary according to Camera Make and Camera Model. Camera users will need to identify a suitable attachment point (e.g., tree, fence post/ stake) near the target area. The most suitable attachment point will depend on the Camera Height, angle, and direction since these choices will impact the FOV (see section 7.4). Figure from WildCAM Network (2019).
7.4.2 Camera Height#
The Camera Height is the height from the ground (below snow) to the bottom of the lens (metres; to the nearest 0.05 m). Cameras should be positioned and secured to an attachment point at ~0.5–1 m height (from the ground to the bottom of the lens; Meek et al., 2014). The most appropriate Camera Height will be influenced by the terrain (e.g., slope), the angle of the tree, as well as the Target Species. Cameras placed closer to the ground reduce the probability that large animals (e.g., moose) will be fully in the frame in the photos. Similarly, if the camera is placed too high, only larger animals will activate the motion detector, and smaller species may be missed (e.g., hares, squirrels, marten) (Meek et al., 2016). The user should ensure that the Camera Height adequately detects motion at a specified Walktest Distance (m) and Walktest Height (m). If snow is a consideration, users may need to place cameras higher or plan to revisit seasonally to adjust as needed, being sure to record adjustments that could affect detection probability.
7.4.3 Camera angle#
The camera angle is the degree to which the camera is pointed towards the FOV Target Feature relative to the horizontal ground surface (with respect to slope, if applicable). The camera angle differs from the camera viewshed angle, which is the area visible to the camera as determined by its camera lens angle and trigger distance (Moeller et al., 2023).
Cameras should be angled slightly downward, such that they should be able to detect both small and large species at a target distance of approximately 3–5 m from the camera and/or the user ensures that the angle adequately detects motion at a specified Walktest Distance (m) and Walktest Height (m). Cameras should not be angled upwards, as upward facing angles will result in fewer detections, especially of smaller species (Glen et al., 2013). If snow is a consideration, users may need to angle cameras higher or plan to revisit seasonally to adjust as needed, being sure to record adjustments that could affect detection probability.
7.4.4 Camera Direction#
The Camera Direction is the cardinal direction that a camera faces. Cameras are usually positioned to maximize detections of the Target Species (except when random placement is required).
The direction a camera faces is an important consideration because it affects the amount of light that reaches the area, which has implications for both detection probability and image quality (reduced quality via sun glare). Ideally, cameras should face north (N, i.e. “0” degrees), or south (S; i.e. “180” degrees) if north is not possible. Sun glare is the most problematic for cameras that face east or west by causing false triggers unless there is thick tree cover blocking the sun (standing water may also produce similar problems with sun glare).
The camera direction should be chosen to ensure the field of view (FOV) is of the original FOV target feature. Generally, cameras should be placed perpendicular to the expected direction of animal travel (e.g., along a game or human trail). Since there is a delay between when an animal enters the camera’s detection zone and when it captures an image, placing the camera perpendicular to the trail increases the likelihood that an animal will be in the frame when the camera triggers (Apps & McNutt, 2018). The delay is typically < 1 s, depending on the trigger speed for a particular camera and the settings applied. The size of the detection zone will depend on the Camera Make and Camera Model.
7.4.5 Field of View (FOV) and Walktest#
It is important to try to ensure an unobstructed Field of View (FOV) from the camera to avoid impairing the detection rates of wildlife (or humans). Moll et al. (2019) reported decreased detection rates with increasing obstruction for most mammals in their study and two- to three-fold decreases in detections per week per camera. They concluded that it was critical to account for viewshed obstruction when interpreting detection rates as indices of abundance and habitat use.
To determine a camera’s FOV, a walktest should be performed every time a camera is deployed or re-positioned. See the camera’s user manual for instructions on how to perform the walktest for your particular Camera Make and Camera Model (see also Appendix A - Table A5).
An unobstructed FOV of at least 5 m wide and 10 m long is ideal for capturing wildlife images in most cases. To achieve this desired FOV, ensure that the camera is detecting motion 5 m in front of the camera, at both 0 m and 0.5–1 m heights (Figure 7).
This may require repositioning the camera to avoid large objects (e.g., rocks, logs) and/or trimming or removing vegetation that interferes with the visibility of the target area (or is likely to in the future). These objects may block areas within the camera’s FOV and reflect the flash, making it more difficult to detect animals at night. Trimming or removing vegetation will also minimize the likelihood of false triggers (i.e., blank images (no wildlife or human present) that can occur because of blowing vegetation). False triggers will drain batteries and fill SD cards and increase the time to process images.
Important considerations with respect to FOV include:
Situations (e.g., open habitats) where animals in background my be viewable but would not trigger the detector (sensor),
how animals in the distance should be treated (i.e., at what distance is an animal captured in an image no longer considered a detection)
Placing a stake in front of the camera at a specified distance (i.e., the “stake distance”) is one method used to standardize the FOV. Applying a standardized reference distance can help with interpretation and analysis (ABMI, 2021).
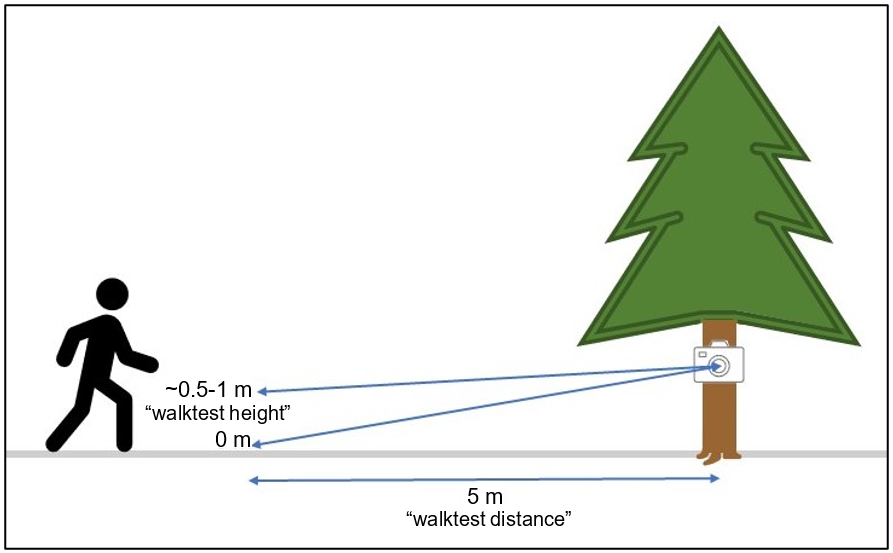
Figure 7. The Walktest Distance and Walktest Height are the horizontal and vertical distances from the camera, respectively, at which the user performs the walk test. A walktest should be performed 5 m away from the camera, at both 0 m (ground) and 0.5–1 m height.
7.4.6 Test image#
A test image is an image taken from a camera after it has been set up to provide a permanent record of the visit metadata. Taking a test image can be useful to compare the information from the test image to that which was collected on the Camera Service/Retrieval Field Datasheet after retrieval, which can help in reducing recording errors.
A test image should include a Test Image Sheet or whiteboard with information on the Sample Station Name, Camera Location Name, Crew, and Deployment Start Date Time (DD-MMM-YYYY HH:MM:SS). See Appendix A - Table A5 for details on how to capture a test image, and for the provided Test Image Sheet.
7.4.7 Deployment Area Photos (optional)#
It is useful to collect photos of the area around the camera location (i.e., deployment area photos) as a permanent, visual record of the FOV Target Features, Camera Location Characteristics, environmental conditions (e.g., vegetation, ecosite, or weather), or other variables of interest.
Take deployment area photos with a handheld digital camera or phone at each camera location at deployment, service and retrieval. The recommendation includes collecting four photos taken from the centre of the target detection zone (Figure 5), facing each of the four cardinal directions. The documentation of the collection of these photos is recorded as “deployment area photos taken” (Y/N).
Record the image numbers (e.g., DSC100; “Deployment Area Photo Numbers“) for each set of camera deployment area photos on a Camera Deployment Field Datasheet).
7.4.8 Camera Location Characteristics#
Camera Location Characteristics are any significant features around the camera at the time of the visit. This may include for example, manmade or natural linear features (e.g., trails), habitat types (e.g., wetlands), wildlife structure (e.g., beaver dam). Camera Location Characteristics differ from FOV Target Features in that Camera Location Characteristics could include those not in the camera’s Field of View.
Researchers typically record information about the environment at camera locations to better understand how this might affect animal occurrence or behaviour. It is recommended to record all Camera Location Characteristics and upload these to a digital data-collection platform with private or open settings like Epicollect, using the template provided. Alternatively, you may choose to upload these photos using species identification models to an open-source platform like inaturalist, WildTrax and/or FWMIS.
7.4.9 Field equipment#
Refer to Appendix A - Table A4 for a recommended list of field equipment for remote camera studies.
7.5 Metadata#
Metadata (i.e., data that provides information about other data) is critical to any scientific study or monitoring program. It helps to ensure that data are consistent and accurate and facilitates data sharing across projects. Alberta and British Columbia have established metadata standards (AB Metadata Standards [RCSC, 2024] and the B.C. Metadata Standards [RISC, 2019]) that all camera projects in the provinces should follow. In these guidelines, we focus on the metadata fields that pertain to the deployment of cameras, which should be collected when the user “visits” the location.
Note
These guidelines do not describe all fields relevant to/required by the AB Metadata Standards (RCSC, 2024) and B.C. Metadata Standards (RISC, 2019). Similarly, there may be additional/alternative fields required by the Alberta Government’s FWMIS loadform (https://www.alberta.ca/wildlife-loadforms.aspx) for camera studies compared to those within these guidelines or the AB Metadata Standards (RCSC, 2024). Every effort has been made to align the various sources where possible.
7.5.1 Metadata - Deployment, Service and Retrieval#
A visit is when a crew has gone to a location to deploy (“deployment visit“), service, or retrieve (“service/retrieval visit“) a remote camera.
A “deployment visit” is when a Deployment Crew has gone to a location to deploy a remote camera. Relevant metadata should be recorded when a camera is initially set up (deployed) using the Camera Deployment Field Datasheet). Each event should have its own Camera Deployment Field Datasheet).
If a camera is deployed for more than one survey, the field crews will need to revisit the camera location to “service” the camera and/or equipment (“Service/Retrieval Crew“; e.g., to refresh batteries or swap out SD cards. If the Service/Retrieval Crew visits the camera location to collect the camera and other equipment (i.e., the camera location will no longer be used and cameras, SD cards, and batteries are not replaced), this is referred to as a “retrieval” (i.e., the camera location will no longer be used, and the camera, SD card, and batteries are not replaced).
Whether the crew services or retrieves the camera, relevant Service/Retrieval metadata should be collected if there have been any changes to camera location, sampling period, and/or setting type (e.g., not baited and then baited later) using the Camera Service/Retrieval Field Datasheet.
Note
Note: the list of Service/Retrieval metadata include additional metadata fields that are not included in the list of deployment metadata.
Nested under the deployment level of the hierarchy, there are a few “groups” of information that help to comprehend the field metadata; these include:
Visit Metadata (collected at deployment and service/retrieval)
Equipment Information (collected at both deployment and service/retrieval; fields vary by visit type)
Camera Settings (collected at deployment)
Camera Placement (collected at deployment)
Site Characteristics (collected at deployment)
Equipment Checks (collected at both deployment and service/retrieval)
Image Set Information (collected as a combination of information from deployment and service/retrieval visits metadata)
Refer to Appendix A - Table A5 for a detailed step-by-step and full lists of metadata fields and to the Camera Deployment Field Datasheet), and the Camera Service/Retrieval Field Datasheet.
7.5.2 Spatial information#
Coordinates collected in the field are often used to obtain land cover information via GIS and can be imperative to finding camera locations later. A large margin of error in collecting coordinates may result in the misclassification of land cover (Robinson et al., 2020) or increase the difficulty of another field crew finding a camera. It is important to record the accuracy (margin of error) of the GPS unit used to record spatial information (coordinates) (i.e., the GPS unit accuracy, e.g., Garmin GPS devices are accurate to within +/- 15 metres 95% of the time). GPS unit accuracy may vary by the make and model of the GPS unit (Hall et al., 2008), but it also may be affected by nearby vegetation, infrastructure, atmospheric interference, etc. (Ganskopp & Johnson, 2007).
7.5.3 SD card retrieval#
When retrieving camera SD cards, remove the SD card from the camera and place it into a SD card case, a 2.25” x 3.5”-coin envelope, or a similar pouch labelled with the Deployment Name and SD card number. If certain camera units are part of a larger survey area, group these pouches into a larger envelope and mark it with the Project Name/Survey Name.